hydroponics
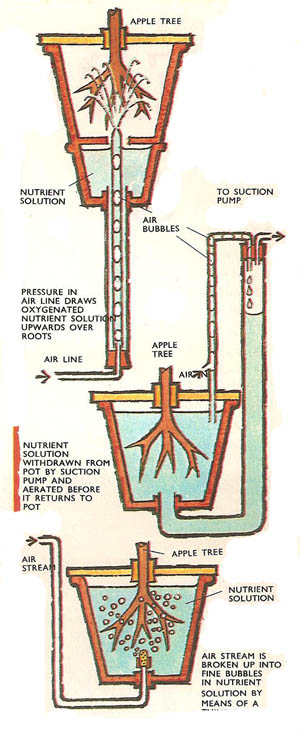
Figure 1. Three methods of supplying nutrient solution to apple trees.

Figure 2. Homemade hydroponics system.
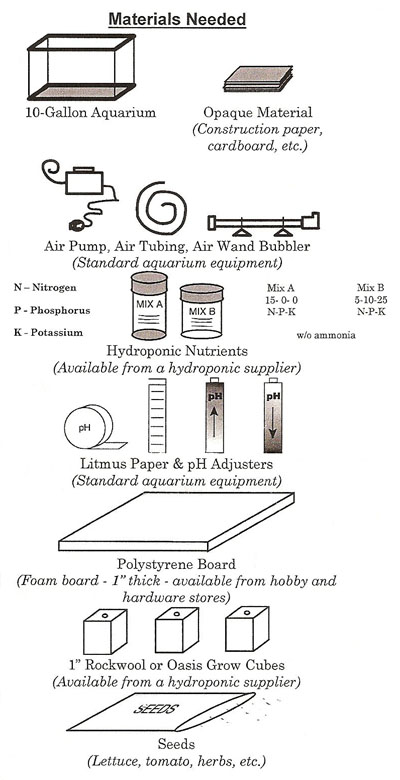
Figure 3. Hydroponic system materials.
Hydroponics is a form of soilless culture in which plants are grown in solutions of pure chemicals. In hydroponics, all the minerals required for plant growth are provided by nutrient solutions in which the roots are immersed. The technique has been highly developed as a tool in botanical research, but commercial exploitation is limited primarily because of the difficulty of aerating the water and providing support for the plants. Gravel culture has overcome these problems to some extent and is used to grow some horticultural crops.
History of hydroponics
More than 300 years ago the first recorded attempt was made to grow plants solely in a liquid medium. In 1804 a Swiss, de Saussure, carried out more controlled experiments, culturing plants in dilute solutions of various salts. Among other things, he showed that a plant is able to absorb the salts it requires from very dilute solutions. From these early beginnings the science of hydroponics emerged.
In the first place hydroponic methods were confined solely to the laboratory. The early plant physiologists used water culture methods to determine the way in which plants feed and the salts that they require. Today, water culture methods are still an important research tool but they also have commercial applications. Some tomatoes and cucumbers, for example, are grown by hydroponic methods.
Development of hydroponics
Purely hydroponic techniques have been largely superceded by others in which the plants are provided with a medium to root in – sand, gravel, and vermiculite are commonly used. The rooting material may be supplied with solid fertilizer which is washed in with water, or with liquid fertilizer containing the necessary salts in the correct proportion. A more advanced method – the sub-irrigation system – involves flooding the rooting material (aggregate) by pumping in a nutrient liquid at preset intervals. Surplus solution drains back very slowly, by gravity, into the large storage tanks and is then available for recirculation. Disadvantages of this method are mainly that the strength of the solution decreases gradually with each application, and, more serious, the proportions of the salts dissolved in it may change. Analysis of this is tricky and requires careful and skilful estimation, for many of the required nutrients are present only in minute quantities. Such elements as molybdenum, manganese, copper, boron, and zinc are needed in amounts less than one part per million in solution. Some substances must be added from time to time to maintain the correct proportions of mineral salts.
However, soilless cultivation has several advantages over normal horticultural methods (though the reverse is also true). The plants can be fed so much more intensively that more can be cultivated in a given area and thus greater yields are obtained than with plants grown in soil in the ordinary way. The feeding can be related to an aggregate whose physical properties are known and which remain relatively constant.
The soil is an ever-changing environment responding both to mechanical and physical factors, such as rainfall, temperature, the drying effects of sun and wind, and the living population. Its organic content (i.e., decaying animal and plant matter) is continually changing, as it is broken down by bacterial and other activity and as the growing plants use up nutrients. The results of applying nutrients and other substances are less predictable, therefore, and soil-borne pests are less easily controlled.
Where overhead watering is employed it is best to use an aggregate that dries out slowly. Clean sand of medium grain size is most suitable, whereas for sub-irrigation techniques a coarser aggregate, such as gravel, is needed.
The composition of the nutrient solution and how often it is applied will vary with the requirements of different plants and also with the season and local weather conditions. A high phosphate level encourages the early ripening of many crops. Tomatoes are responsive at different times of the year to varying proportions of the three major plant nutrients – potassium, nitrogen, phosphorus – and so the dosage is varied to produce the maximum yield. Tomatoes are also among the most responsive crops to potassium. On the other hand the provision of excessive quantities of potassium may well accentuate magnesium deficiency.
How to build a hydroponic tank
A simply hydroponic system can be constructed for use by students, teachers, and beginning hydroponic enthusiasts. It utilizes a 10-gallon aquarium, an air supply, polystyrene board, and plants (Figure 2). If maintained properly, it can supply delicious fresh vegetables and herbs.
Starting the plants
Seedlings should be seeded prior to filling the tank. read the back of the seed package carefully; it will provide the germination (sprouting) time for whatever vegetable or herb is to be grown. Using rockwool or oasis cubes, place one seed in each cube and keep the cube moist until the seed has germinated. After the seeds germinate, they can be watered with a half-strength nutrient solution. Be sure to have a small seedling that has developed a few good roots before transferring to the hydroponic tank.
Steps for assembly and operation of the hydroponic system
1. Set the aquarium in a south window to allow the plants to receive full light, or for best results, use an artificial grow light (Figure 3). Cover the sides of the aquarium with dark opaque material to prevent light from entering the sides. This will prevent algae growth in the nutrient solution.
2. Place the air pump outside the aquarium and the air wand bubbler on the bottom of the tank. Run the air tubing from the air pump to the wand.
3. Fill the tank with clean water and add the hydroponic nutrients (available from a hydroponic supplier). Remember to follow the instructions on the label when mixing the nutrients with water. Once the nutrient solution is in the tank, be sure to turn on the air pump and adjust air flow for a soft gentle flow of bubbles in your tank.
4. Once the nutrient solution has been thoroughly mixed it must be adjusted to a proper pH (pH test kits and adjusters are available from a hydroponic supplier). Using the litmus paper, test your nutrient solution. Nutrient adjustments can be made by using a pH up (base) or pH down (acid). The target pH should be 5.5 A safe pH range is 5.5–6.5.
5. Cut the polystyrene board so it floats on the nutrient solution and fits tightly into the tank. Cut 1" square holes in the board, 6–7 in apart. This will allow for about six plants in the hydroponic tank.
6. Insert the rockwool or oasis cubes containing small seedlings into the holes in the polystyrene board. Be sure that the cube extends slightly below the board so it can absorb the nutrient solution.
7. To main the system, check and adjust the pH of the nutrient solution each week. If the nutrient solution level in the tank has lowered, you can add a half-strength nutrient solution to bring it back up to volume.
8. After the crop has completed its life cycle, be sure to drain and thoroughly clean the tank before you start a new crop of vegetables or herbs.