
moisture control
Properly controlling moisture in your home will improve the effectiveness of your air sealing and insulation efforts, and vice versa. Thus, moisture control contributes to a home's overall energy efficiency.
 |
| Moisture insulation
|
The best strategy for controlling moisture in your home depends on your climate and how your home is constructed. Before deciding on a moisture control strategy for your home, it is important to understand how moisture moves through a home.
How moisture moves through a home
Moisture or water vapor moves in and out of a home in three ways:
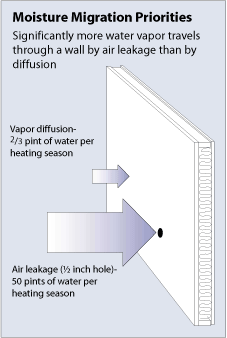 |
| Moisture migration
|
Of these three, air movement accounts for more than 98% of all water vapor movement in building cavities. Air naturally moves from a high pressure area to a lower one by the easiest path possible – generally through any available hole or crack in the building envelope. Moisture transfer by air currents is very fast (in the range of several hundred cubic feet of air per minute). Thus, you need to carefully and permanently air seal any unintended paths to control air movement.
The other two driving forces – diffusion through materials and heat transfer – are much slower processes. Most common building materials slow moisture diffusion to a large degree, although they never stop it completely. Insulation also helps reduce heat transfer or flow.
The laws of physics govern how moist air reacts within various temperature conditions. The study of moist air properties is technically referred to as "psychrometrics." A psychrometric chart is used by professionals to determine at what temperature and moisture concentration water vapor begins to condense. This is called the "dew point." By understanding how to find the dew point, you will better understand how to avoid moisture problems in your house.
Relative humidity (RH) refers to the amount of moisture contained in a quantity of air compared to the maximum amount of moisture the air could hold at the same temperature. As air warms, its ability to hold water vapor increases; this capacity decreases as air cools. For example, according to the psychometric chart, air at 68°F (20°C) with 0.216 ounces of water (H2O) per pound of air (14.8g H2O/kg air) has a 100% RH. The same air at 59°F (15°C) reaches 100% RH with only 0.156 ounces of water per pound of air (10.7g H2O/kg air). The colder air holds about 28% of the moisture that the warmer air does. The moisture that the air can no longer hold condenses on the first cold surface it encounters (the dew point.) If this surface is within an exterior wall cavity, wet insulation and framing will be the result.
In addition to air movement, you also can control temperature and moisture content. Since insulation reduces heat transfer or flow, it also moderates the effect of temperature across the building envelope cavity. In most U.S. climates, properly installed vapor diffusion retarders can be used to reduce the amount of moisture transfer. Except in deliberately ventilated spaces, such as attics, insulation and vapor retarders work together to reduce the opportunity for condensation in a house's ceilings, walls, and floors.
To effectively control moisture in your home, you need to first consider your climate when exploring your moisture control options.
Moisture control strategies
These typically include the following areas of a home:
- Basement
- Crawl space
- Slab-on-grade floors
Moisture control in basements
To effectively insulate your basement for energy efficiency and to create a comfortable space, you need to properly control moisture in your basement.
Most basement water leakage results from either bulk moisture leaks or capillary action. Bulk moisture is the flow of water through holes, cracks, and other discontinuities into the home's basement walls. Capillary action occurs when water wicks into the cracks and pores of porous building materials, such as masonry blocks, concrete, or wood. These tiny cracks and pores can absorb water in any direction – even upward.
The best approaches for preventing these problems will depend on your local climate, type of insulation, and style of construction. However, the following general rules apply to most basement designs for creating a water-managed foundation system (see corresponding illustration):
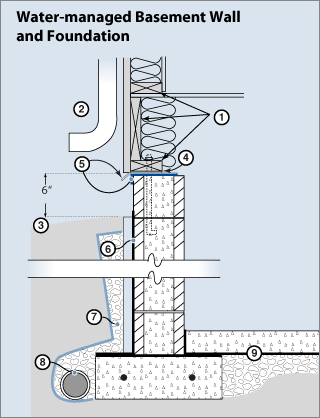 |
Consult a qualified builder, basement designer, basement waterproofing contractor, and/or insulation contractor in your area for specific basement moisture control measures concerning your climate, type of insulation, and construction style.
Crawl space moisture control
To effectively insulate your crawl space for energy efficiency and to create a comfortable home, you need to properly control moisture in your crawl space.
A crawlspace is susceptible to moisture and deterioration problems because of contact with the earth. The best approaches for preventing these problems will depend on your local climate and the style of your home's construction. However, the following general guidelines for creating a water-managed foundation system apply to most crawl space designs:
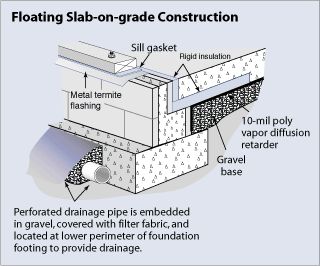
Slab-on-grade foundation moisture and air leakage control
To maximize your home's energy efficiency and to protect the foundation, you should use the following moisture and air leakage control techniques when installing slab-on-grade floors:
 |
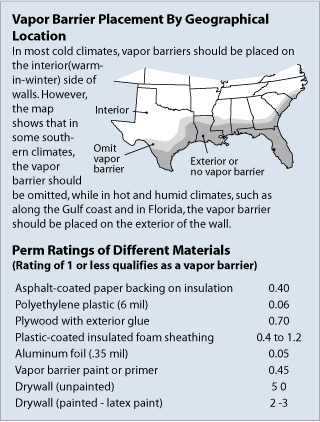
Moisture control in walls
It is a myth that installing vapor barriers is the most important step for controlling moisture in walls. Vapor barriers only retard moisture due to diffusion, while most moisture enters walls either through fluid capillary action or as water vapor through air leaks.
 |
All climates require these moisture control steps:
Causes of rain leaks through exterior walls include improper installation of the following:
To enhance protection against rain penetration, create a drainage plane within the wall system of the home.