
electric water heater insulation installation
Here are step-by-step instructions for installing an insulation blanket on an electric storage water heater. If the insulation blanket you've purchased comes with instructions, read and follow those.
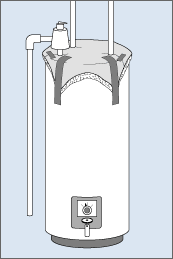
1. Cut the tank top insulation to fit around the piping in the top of the tank. Tape the cut section closed after the top has been installed.
2. Fold the corners of the tank top insulation down and tape to the sides of the tank.
 |
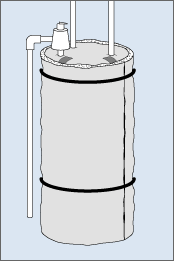
3. Position the insulating blanket around the circumference of the tank. For ease of installation, position the blanket so that the ends do not come together over the access panels in the side of the tank. Some tanks have only one access panel.
4. Secure the blanket in place with the belts provided. Position the belts so they do not go over the access panels. Belts should fit snugly over the blanket but not compress it more than 15–20% of its thickness. The installation is easier with two people. If working alone, use tape to hold the blanket to the top until you get the belts into position.
5. If your water heater has the temperature/pressure relief valve and the overflow pipe on the side of the tank instead of on the top, install the blanket so these items are outside of the blanket. Depending on the piping arrangement and location, you may need to compress (or even cut) the blanket.
 |
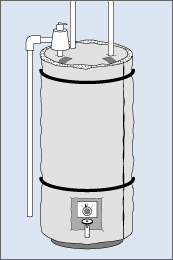
6. Locate the four corners of the access panel(s). Make an x-shaped cut in the insulating blanket from corner to corner of each access panel.
 |
7. Fold the triangular flaps produced by the cuts underneath the insulating blanket. Repeat steps 6 and 7 for the rating/instruction plate.
 |
Note: The blanket must not be installed on a leaking tank. If your tank leaks, you need a new water heater.
Don't set the thermostat above 130ºF. The wiring may overheat.