UP, UP, AND AWAY: The Science of Flight - 2. Wings and Lifting Things

Figure 1. Bald eagle flying.
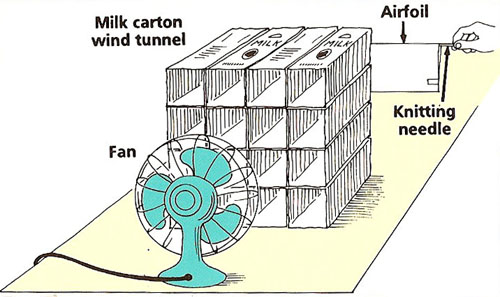
Figure 2. Many molecules bumping into a surface, such as your hand, create pressure.

Figure 3. How the shape of a wing, or airfoil, creates lift.
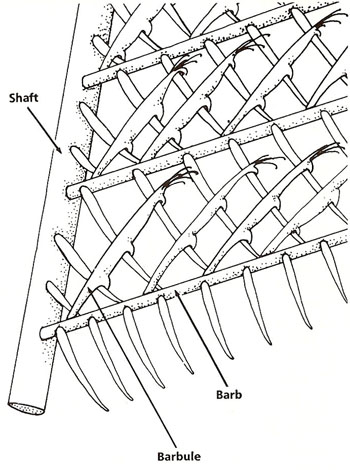
Figure 4. Close-up diagram of a bird's feather.
Birds and airplanes have one very important thing in common: They both make use of wings to fly (see Figure 1).
An eagle and an airliner may not look alike, but their wings are shaped in a similar way. The upper surface of the wing is curved. It rises steeply and smoothly from the front, or leading edge, and then drops away gently to the rear, or trailing edge. The lower surface of the wing, by comparison, is much flatter.
Why should this particular shape be so important for flight?

A wind tunnel
You will need:
What to do: Cut out the front and back of the milk cartons. Glue or tape the cartons together to make a 4-by-4 square, as shown. Fix this arrangement to the wooden board. Place the fan behind cartons so that it is exactly in line with them. Position the center of the fan opposite the center of the square. The basic wind tunnel is now complete.
Fold the sheet of paper in half. Tape the top half to the bottom half about 1 inch from the edge. The paper now looks like a stubby wing. Slide the knitting needle into the fold.
Turn the fan to its lowest speed. Hold the knitting needle level in the center of the air stream with the curved side of the wing uppermost (see Figure 2). What happens? Turn the wing upside down and try again. What effect does this have?
Taking it further: Tape several pieces of thread along the front edge of the wing so that they trail back over the upper wing surface. Replace the wing in the wind tunnel. What happens to the thread when the air stream is turned back on? What happens if you switch the fan to a higher speed?
Make wings of various different shapes and test them. Records your results and try to explain them.
Experiment in depth: Many improvements to the basic wind tunnel are possible. It would be very useful, for example, to install a fan with a continuously variable speed. This should only be attempted by an adult with a good knowledge of electrical equipment. Similarly a device for measuring wind speed (an anemometer) would be a valuable addition for more advanced experiments. The milk cartons could be replaced by a more permanent array made from thin panels of wood.
Some sort of arrangement will also be needed if model planes are to be tested properly in the wind tunnel. A framework could be built from which the model could be suspended by threads. The threads would need to be slack enough that the plane could rise or fall, or bank to the left or right, but not so loose as to let it go out of control. In practice, this is not easy. An alternative method is to hold the plane steady and tape cotton thread to the areas of interest on the model. The way in which the thread is blown indicates the behavior of the air flow. |
Wings and Lift
Think what happens as a wing passes through air. At the leading edge of the wing, the airflow divides. Some air goes over the top of the wings; the rest goes underneath. Because of the Coanda effect, the airflow tends to "hug" the outline of the surface over which it is moving.
The air passing under the wing continues on more or less a straight line. This is because the lower surface of the wing is almost flat. However, the air flowing over the wing has farther to go, because the upper surface is curved. To keep up with the air underneath, the air on top has to move faster. But by Bernoulli's principle, higher speed means lower pressure. As a result, the air on top of the wing must press less strongly against the wing than does the air underneath.
Since the downward pressure on the top of the moving wing is less than the upward pressure on the bottom of the wing, there is an overall upward force. This upward force is called LIFT (see Figure 3).
A wing shape, or AIRFOIL, happens to be the best shape for producing lift. That is why nature uses airfoils in birds, flying insects, and bats, and why human engineers use them in various types of aircraft.
|
Losing lift
You will need:
What to do: Set up the wing in the wind tunnel as before. Observe its position in the moving airstream. Now block off the air from the top of the wing with the piece of cardboard. To do this place the edge of the cardboard along the center of the leading edge of the wing so that the cardboard shields the upper surface of the wing. What happens?
Repeat the test with the cardboard blocking off the wind from the lower surface of the wing. What do you observe?
Try to explain your results in terms of what you have already learned about lift. |
The Flight of the Frisbee
Scientific discoveries and inventions are often made completely by accident. Take Frisbees, for instance. In 1871, William Russell Frisbie opened a pie factory close to the college that, sixteen years later became Yale University. Hungry students of the college, who were regular customers, soon found that the empty pie tins flew extremely well when thrown upside down! It was not until the 1940s, however, that someone took full advantage of the idea. Then Frederick Morrison, a keen pie-tin thrower, made a similar disk out of a new type of plastic. Later, he sold his invention to the Wham-O Corporation of California, which coined the named "Frisbee" for the toy.
A Frisbee produces lift in the same way as a wing. That is, the top of the disk is curved while the bottom is flat. During flight, this results in a lower air pressure on top than on the bottom. But the similarity between the Frisbee and a wing ends there. Because of its spin, the Frisbee behaves in a much more complicated way.
|
Looking at feathers
You will need:
What to do: Look at the feather from the side. What shape does it have? Examine the feather under the magnifying glass or microscope. What do you see?
Identify the central shaft and the barbs projecting from each side. Focus on one of the barbs. Attached to each barb are tiny branches called barbules. These lock together – but how? Examine them carefully to find out (see Figure 4).
Hold the feather straight out by the end of its shaft. Tilt it so
that the front edge is slightly higher than the back. Now move it
quickly through the air. What do you notice? |
Feather Power
 |
The main problem facing a bird – especially a heavy bird – is taking off. To do this, the bird has to beat its wings very hard to force air quickly over the wings' upper surfaces and so produce a lot of lift. Once it has climbed high enough, the rate of beating can be reduced to that needed for level flight.
Several factors help to give birds mastery of the air. They have bones that contain many hollow spaces, making them lightweight yet strong. A bird's chest muscles, which operate the wings, are extremely large and powerful. And, finally, the wings themselves are covered in tightly fitting feathers that trap the air.