UP, UP, AND AWAY: The Science of Flight - 3. Plane Easy!

Figure 1. Boeing 747 in flight.

Figure 2. These drawings show the steps needed to build your paper test airplane.

Figure 3. Changing the position of an airplane's flaps causes it tu turn left or right and to gain or lose altitude.

Figure 4. Viewed from above, an airliner's control surfaces on its wings and tail are clearly visible.

Figure 5. The four main forces that act on an aircraft.
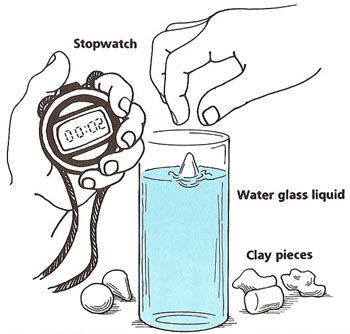
Figure 6. Experimenting with drag.

Figure 7. Wing positions of a swept-wing aircraft.

Figure 8. A turbojet engine (top) is much more powerful than a turboprop engine (bottom).
There is much more to an airplane than just a wing. By some means, the plane has to be able to control its flight. It has to be able to go up and down, and turn to the right and to the left.
A plane must also have some means by which to go fast enough. Only if the air flows over the wings above a certain speed will the lift be sufficient for the craft to leave the ground or stay in the air. In order for a jumbo jet to take off, for example, it must normally be traveling between about 165 and 182 miles per hour. As it climbs, it goes faster and faster, until it levels out at a height of about 32,000 feet and a cruising speed of around 570 miles per hour.

Test flights
You will need:
What to do: Take the larger sheet of paper and make a fold 2¼" from one end as shown. Place the long side under the ruler and pull upward to give this side a gentle curve. Glue the back edges together to make an airfoil shape. This is your aircraft's main wing. Cut and crease two small flaps at the back edge of the wing as shown.
At this stage, you may choose to test your wing in the wind tunnel. Test the wing with the flaps level, with both up or down, and with one up and the other down. What do you notice? What does this tell you about how the wing may behave in flight?
Form the tail by folding and gluing as shown. Cut away the back ½" of the tail planes so that the upright flap – the rudder – sticks out. Cut and crease the flaps on the tail planes. Fix the wing and tail securely to the straw with tape. Make sure that the main wing and tail planes are lined up and even. The front edge of the wing should be 2 inches back from the nose. The back of the tail planes should line up with the rear of the straw so that the rudder overhangs. Fix one or two paper clips to the nose to counterbalance the weight of the tail.
Experiment with the whole plane in the wind tunnel if you wish. Then carry out a number of test flights with the flaps and rudder in various different positions. What happens if you alter the number of paper clips on the nose? What happens if you launch the plane at different speeds and at different angles to the ground? Try to explain your findings.
Taking it further: Design your own plane with wings of different shapes and sizes. Use other materials such as balsa wood or Styrofoam. Test the planes thoroughly both in the wind tunnel and in free flight. Keep a record of all you results. |
At the Controls
Hinged flaps, called AILERONS, on the trailing edge of an aircraft's main wing can be moved up and down by the pilot. If an aileron is raised, this slows the air moving over the upper surface of the wing, thereby increasing its pressure. As a result, the wing has less lift. If the aileron is lowered, the air speed over the upper wing surface is increased, which decreases the pressure. So, in this case, the lift becomes greater.
What happens if the left aileron is raised and the right one is lowered? The answer is that the left wing drops because it loses lift, the right wing rises because it gains lift, and the plane as a whole banks to the left. If the position of the ailerons is reversed, the plane banks to the right. To assist in these movements, a RUDDER on the tail is tilted to the left for a left turn and to the right for a right turn.
Two smaller flaps on the tail planes at the back of the plane can also be moved up and down. These are known as ELEVATORS. With the elevators in the "down" position, the lift on the tail is increased, so that the nose drops and the plane dives. On the other hand, if the pilot puts the elevators up, this causes the tail to drop and the plane to soar.
If you have the chance to visit an airport or to sit near the wing during a flight, watch carefully how a plane's flaps are positioned to control its flight.
A Battle of Forces
Four main forces act on an aircraft. There is the lift acting upward and the weight of the plane acting downward. If the lift is greater than the weight, the plane goes up. If the lift is less than the weight, the plane goes down (or stays on the ground). And if the lift and weight are equal, the aircraft continues in level flight.
To move forward the plane must use its engines. These produce a forward force known as THRUST. Thrust is needed to make the plane go at a sufficient speed for the air rushing over the wings to produce enough lift. Acting in the opposite direction to thrust is the resistance of the air on the plane's wings and body. This resistance is called DRAG.
|
It's a drag
You will need:
You will need:
What to do: Break the clay into pieces exactly the same size. Make various shapes from these pieces. Some may have curving outlines such as balls, tear-drops, or bullet shapes, while others will be more angular or irregular.
Pour water glass into the container until it is about three-quarters full. Drop each of the shapes in turn from the surface of the water glass and use the stopwatch to time how long it takes for each to reach the bottom. Which shapes travel fastest? What does that tell you about the amount of drag acting on them?
Try dropping other objects such as marbles, coins, nails, and so on. Observe carefully how they move.
Warning: Water glass should not be swallowed. Wash your hands and
clean up thoroughly after the experiment. |
Streamlining
Engineers have to try to keep both the weight and the drag force as low as possible when they are designing a new aircraft. Using lightweight yet strong metals, such as aluminum, helps to maintain a low weight. But drag is a more complicated problem. Even the slightest unevenness in the surface of a wing or a plane's body can raise the drag force by a large amount.
Using wind tunnels and computer calculations, researchers experiment with different wings, tails, and bodies to find an overall shape that will slip through the air easily, yet still provide the plane with enough lift. A good shape, over which the airflow moves smoothly, is said to be STREAMLINED.
|
Your own wing
You will need:
You will need:
What to do: Can you make paper planes? If not, have someone show you how. In fact, there are many different ways to build flying models from a sheet of paper. Look for books on the subject or ask your friends if they have any special designs of their own.
Make paper planes with wings of different shapes and sizes – some narrow and sleek, others broad and rectangular. What differences do you observe in their performance? Which planes work best thrown hard and which are better at slow gliding? |
A Choice of Wings
Look at the different types of aircraft shown on these pages. Look also at the photographs of both military and civilian planes. What do you notice?
Aircraft designed to fly at very high speeds, such as jet fighters, have very thin bodies. Their wings are narrow and swept back. The reason for this is that the drag force acting on an object rises very rapidly as its speed increases. For example, if a plane goes from 500 to 1,000 miles per hour, the amount of drag on it rises by a factor of four. So, it is essential that such a plane offers as little resistance as possible to the air flowing over it.
On the other hand, sleek, sharply angled wings do not give much lift. This
is not a problem when moving fast, since the amount of lift increases with
increasing speed. But it does mean that high-speed jets need powerful engines
to enable them to take of quickly and climb steeply.
Planes that are designed to travel more slowly are not so seriously affected
by drag. Their wings are wider and stick out more from their sides so that
they can obtain plenty of lift even at fairly low speeds.
Swing-wings
The best of both worlds is a plane that can alter the shape of its wings in flight – a so-called "swing-wing." One of these is the Panavia Tornado, a multipurpose fighter member capable of bombarding other planes in the air or attacking ground targets. For takeoff and for flying at low speeds, the Tornado�s wings are kept straight out from the sides. But as the aircraft gathers speed, its wings are moved into their swept-back position. This greatly reduces the drag on the plane and also allows it to make very sharp turns during aerial combat.
Props and Jets
Until the 1940s all planes were powered by one or more spinning PROPELLERS. A propeller is basically just a twisted airfoil. As it spins, it squashes the air that flows over it so that there is a higher pressure region behind the propeller than in front of it. Because of this pressure difference the plane is pushed forward.
A JET ENGINE also has a system of revolving blades inside. These make up what is called a compressor. As the blades of the compressor spin around, they suck air in and squeeze it to 10 times its normal pressure. The air then enters a special chamber where it is mixed with fuel and burned. The hot exhaust gas from this burning mixture shoots out of the back of the jet engine and so provides the plane with a forward thrust. The escaping gas also turns around a big fan known as a turbine, which is connected to the compressor to make it turn.
Being much more powerful than a propeller engine, a jet enables modern planes to fly at very high speeds – in some cases, over 2,000 miles per hour. A jet engine also works more efficiently than a propeller at high altitudes where the air is thin.